I once explained my usage of our microwave. I use 3 buttons: a "pizza button" (25 seconds) * n times (e.g. n=2 is 50 sec, n=3 is 1.15 min …), start and stop buttons. Our microwave probably does miracles but I (and I’m sure a lot of other people) use it only for heating drinks and food. I use the "pizza button" even for defrosting.
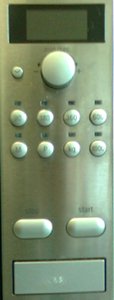
The microwave in the photo is from the lab’s kitchen. It has an easy interface, but on the first sight. Let’s look at the heating procedure:
- Select the heating power (90, 180, 360, 600, 1000) – in the middle of the panel
- Adjust time with the round button – top of the panel
- Press the start button – bottom of the panel
If the power is not selected, timer is not working either. To start with a step 2. a step 1. has to be completed. Most microwaves have a default heating power. If a user starts with the time it lets her/him proceed! It took me a while to understand why a button to adjust the time is not working.
 |
 |
Then look at the arrangement of power buttons as they are not in one line but rather split in two lines. I would guess that designer thought that power button labeled ‘1000’ would not be used often. Or even that this button doesn’t need to be grouped with the rest of power buttons. I would rather not have the button labeled ’90’ (I’d guess that most users want their food heated quickly) and fit all power buttons in one line.
Look also at the labels: M, P and kg. The last one is probably to select the weight of the food (to be heated or defrosted). Which button is used to enter weight? Maybe the round button, but the label above it says only sec/min. What are M and P buttons for? Now very informative.
And the last, look at how the interface is set up for the most used function: heating. The first step requires manipulation of the interface in the middle, the second on the top and for the third step a user has to go down to the bottom. The user has to travel too much on the interface. This interface would be much nicer if a procedure would follow the top-down approach.
- Top: select heating or leave it on a default value.
- Middle: adjust time.
- Bottom: press start.